Showing posts with label vegetarian. Show all posts

Oct 3, 2011

almost vegan pizza

What could be better than starting off Vegetarian Awareness month with a meat-free pizza party?! Pizza is one of those wonderful, easy, versatile meals that I can never get sick of. Seriously, you could put anything on a pizza and it would be delicious.

Last week, me and the roommate opened opened some wine, watched Project Runway, and made ourselves some fantastic homemade pizzas!

Stuff you need: 1. Pre-made pizza crusts- we like the ones from Whole Foods- you get 2 per pack 2. Any toppings your heart desires!

Once again, anything on a pizza will taste amazing. Here were our concoctions:
Molly's Pizza!
Side 1: Brie, chopped garlic, carmelized onions, & arugula
Side 2: Tomato sauce, broccoli, zucchini, green bell pepper, & mozzarella cheese

My pizza!
Side 1: Tomato Sauce, zucchini, red bell pepper, yellow bell pepper, & onion
Side 2: Tomato sauce, tomato slices, fresh basil, & almond cheese

While Molly's pizza was very cheesy, I decided to go with an almost vegan version. My favorite non-cheese cheese is the almond or rice cheese made by Lisanatti Foods. I completely fell in love with it a few years ago, while looking for vegan options to my favorite foods. The texture is impeccable- melts alright, and can be shredded- it's not slimy like a lot of soy cheeses, and best of all the flavor is great. UNFORTUNATELY, it's made with casein, so after all my searching, my favorite vegan cheese isn't vegan at all *sad trombone* If you're looking for a healthy alternative to cheese, I highly recommend this stuff. However, if you're morally opposed to any and all dairy products, this one isn't for you :(

Anyway, it was a delicious pizza party. Both versions were super tasty, and made plenty of food for our lunches the next few days. For next time, Molly recommends getting good quality brie (instead of the cheap-o stuff) so it melts better, and I recommend sautéing the veggies before applying them to the crust, for more flavor, and delicious pizza cohesion. Great night. Great food.

ALSO! Don't forget to check out VeganMoFo when you get the chance! I was too nervous to join in this year, but they're only 3 days in, and there's already TONS of amazing looking dishes! Maybe next year I'll grow a pair and join in the fun :)

Sep 20, 2011

veg eats at the ballpark

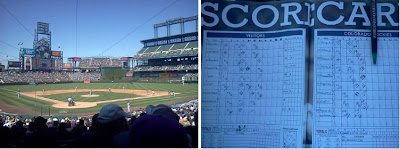
With the baseball season coming to a close in Colorado, Pop and I finally made the time to enjoy a Rockies game together this past weekend. The seats were great, and the company was even better- too bad the Rockies couldn't pull it together for a win against the Giants. *Sad trombone*
When going out to eat somewhere as meat-centric as a baseball stadium, it's always a challenge to find something vegetarian or vegan. When you think about a sports area, don't you always think of hot dogs, burgers, and nachos? I certainly do. Surprisingly enough, Coors Field has some meat-free options- yayy! In fact, Coors Field was named one of PETA's Top 10 Most Vegetarian-Friendly Ballparks in the country!

I personally think the selection of meat-free foods has decreased since last year, but hey, as long as I can find something tasty to accompany my beer, I'm happy. This weekend, Dad and I found Garden burgers and veggie dogs over at section 134. Not the best I've had, but definitely not the worst. In these situations, the key is loading it up with anything you can get your hands on- ketchup, mustard, onions, relish, sauerkraut, veggies, you name it! Drink 2 more big beers, and I promise it will taste pretty damn good :)
According to the Rockies website, you can also find veggie paninis, pizzas, burritos, and wraps around the ballpark. Whether these options will be well-crafted vegetarian fare is another thing, but hey, I'm not too picky. I just like the fact that in such a testosterone-pumping-beer-guzzling-sports-watching-area, that there are meat free options at all. Big kudos to you Coors Field. Go Rocks! :)

Sep 8, 2011

veggie pot pie

I think I've eaten one singular pot pie in my entire 24 years of life. My parents never made them, I never order them while out, and I've never had the thought to make one myself, until tonight! For some reason I got a mad pot pie craving while sitting in the office today, and instead of being productive and going to the gym, I promptly came home and fulfilled my pot pie desires. I loosely based the recipe off this one from Betty Crocker, but used what I had in the cupboards, and completely vegatized it!

Stuff you need: 1. Any veggies for the inside 2. 1/2 cup Bisquick Heart Smart mix 3. 1 egg white or egg replacer 4. 1/4 cup milk or milk substitute

Start by preheating your oven to 400 degrees while you get everything else ready. For the vegetable filling, I found in my kitchen 2 carrots, 1 zucchini, 2 tomatoes, 1 cup mushrooms, and a handful of frozen corn. Sauté the veggies in a little olive oil just until they begin to soften. Sprinkle the mixture with a little salt, Italian seasoning, and anything else you think might be nice.

Meanwhile, combine the Biquick, egg white, and milk in a bowl, and whisk all the ingredients together. When the oven is preheated and the vegetables are slightly tender, place the veggies into a small casserole dish that you've lightly greased. Now pour the Bisquick mixture on top of the vegetables, and make sure everything is nicely distributed and coated in batter. Look good? Great! Pop it in the oven for 20 ish minutes, and then dig into that tasty little pot pie.
For the second pot pie of my entire life, I'm pretty pumped! The hot, juicy filling is so nice with the warm, fluffy pastry top. I skipped the soup from the original recipe, so it definitely wasn't creamy, but the tomatoes gave off juice, so the filling was still plenty moist. My only thought for next time is more spices and longer cooking time! I was so excited for my dinner and a new episode of Project Runway, that I pulled the dish out of the oven before the top was super golden. Otherwise, it was a damn tasty meal, and one that came together surprisingly quick and easy. It may have been my second pot pie, but it most certainly won't be my last :)

Aug 31, 2011

a better breakfast burrito

If I have not properly expressed this previously, let me tell you that I am not a morning person. I'm the girl rolling into work at the crack of 9 am, still putting on makeup, and eating oatmeal out of a coffee mug. For these reasons and many more, I rely heavily on late night planning, and frozen, homemade breakfast burritos. A while ago, I made my first batch of breakfast burritos, and since then, I think they've just gotten better. In fact, this last round has been the best yet!

Stuff you need: 1. Whole wheat tortillas 2. 1 block firm tofu 3. Morningstar sausage patties 4. Roasted green chiles 5. Your favorite salsa

Begin by squeezing your tofu like you would for any other recipe- I like to wrap mine in a paper towel, and set something heavy on top of it while I prepare everything else. Meanwhile, you can chop your chiles and defrost your faux-sausage.

When the tofu is ready, crumble it into a skillet with a little olive oil, the Morngingstar sausage, green chiles, and some spices until everything is warmed through. In my tofu/faux-meat mixture, I like to add hot sauce, garlic salt, and cumin. Yumm.

When your burrito stuffing is tasting the way you'd like it to, grab a tortilla, spoon a healthy helping of the tofu mixture into the middle, add a bit of salsa, and then wrap the whole thing up in a square of foil.

Keep wrapping burritos until you're out of filling and tortillas, and then pop them into the freezer for future use. For me, 1 block of firm tofu made about 6 burritos.
When you're ready to devour your breakfast burrito, wrap it in a paper towel, and microwave it on high for 1 minute on each side. The tofu is difficult to heat all the way through, so it may need a little extra time as well. This not-so-fabulous picture is taken inside the microwave at my office. While not super aesthetically appealing, it was absolutely scrumptious, and the perfect way to start off a long day at work.

The combination of the fake sausage, chiles, and salsa, are the perfect mix of texture, heat, and flavor. They're fast and easy to make, they're absolutely delicious, and they're a total life saver first thing in the morning. You better believe I'll be making more of these very soon :)

Aug 28, 2011

southwest veggie bake

Last week was crazy for me. Between multiple grandparent birthday dinners, 10 hour work days, and a few kickboxing classes, I barely had time to breathe, let alone cook! Luckily, with some quick, simple recipes, and some planning ahead, I survived the chaos! One such recipe I made, was inspired by this summer vegetable tian over at Budget Bytes. The reds, greens, and yellows of the tomatoes and squash, were totally eye-catching, and I knew in a moment that I had to make my own version.

Stuff you need: 1. Yellow squash 2. Zucchini squash 3. Tomatoes 4. Black beans 5.Sharp cheddar cheese 6. Your favorite salsa

Start by preheating your oven to 350 degrees while you get everything else prepped. Slice your squashes into rounds, and your tomatoes into chunks that are roughly the same size. When everything is chopped up, arrange all the slices in a greased baking dish, until it's completely full. Give it a good sprinkle of salt and pepper, and maybe a little cumin too for good measure.
Next, combine 1/2 cup black beans, 1 heaping cup sharp cheddar cheese, and 1/4 cup salsa in a bowl, and stir everything together, until it's mixed well. Spread this mixture on top of your veggies, and then cover the dish with its corresponding lid or some foil.
Pop the dish into the oven for about 30 minutes, or until the the vegetables are tender, and the cheese is melted and bubbly. Now grab those hot pads and retrieve your meal! I gobbled mine down with a little more salsa on the side, but it was pretty tasty on its own as well.
The colors of the summer vegetables are so pretty, and the meal came together incredibly quick. It's a great dish for a busy week, because I managed to do laundry and other chores, while I waited for it to bake. I also liked the addition of black beans and salsa, which gave it a little protein, and a gooier texture. Next time, onions, potatoes, and more spices would all be excellent additions. It was the perfect dish for a busy week, and it made enough for lunch the next day too- bonus! :)

Aug 21, 2011

spinach stuffed shells

One of my favorite things in the world is making dinner with friends. There's nothing like getting together on a beautiful evening to drink wine, gossip, and create something simply delicious as a group. I honestly think the meal tastes better when the effort is shared through hard work, and lots of laughter. Tonight happened to be one of those evenings when Michael, Jenna, and I got together to watch the newest episode of True Blood, and make spinach stuffed shells over a few bottles of cheap white wine. Nothing could possibly make me happier :)

Here's Michael & Jenna slaving away over my stuffed shells. You can tell they're good cooks 'cause of the pouffy hats and curly mustaches.
Stuff you need: 1. Pasta shells 2. Ricotta cheese- 1 15 oz tub 3. Parmesan cheese 4. Fresh spinach 5. Fresh basil 6. 2 jars red pasta sauce of your choice 7. Garlic

First and foremost, put a large pot of water on the stove to boil, preheat your oven to 350 degrees, and crack open that first bottle of wine- making stuffed shells is a slightly long and tedious task, but trust me, it's totally worth it in the end. When the water comes to a rolling boil, throw in your shells with some salt, and cook them until they're al dente.

While you're waiting for your noodles to soften, sauté the spinach and diced garlic in a little bit of olive oil, until the leaves are nice and wilted. Combine the spinach, ricotta, parmesan, and chopped basil in a bowl, and mix it all up with some fresh ground black pepper. We kept things simple with spinach and cheese, but other veggies or faux sausage might also be a nice addition to the stuffing mixture as well.

When the noodles are softened, drain them, and rinse them under cold water. Be warned. If you skip the cold water step, you will burn your hands off. TRUE STORY.

Take the shells, stuff them with the cheese mixture, and place them into a baking dish that has a layer of the pasta sauce on the bottom. Keep filling up the shells until you're out of supplies, and then cover the whole dish with another layer of pasta sauce. Pop the pan into the oven for around 20-30 minutes, or until it's warmed through and bubbly. Pull out the pasta, give it a good sprinkle of parmesan, and put it back into the oven for a final 5 minutes. When you can stand it no longer, serve up those shells and dig in!
Oh my, look how delicious those little cheese pockets look before and after getting baked into gooey deliciousness. For time management and calorie intake, it's definitely not a meal I would make all the time, but if you'd like to show off a bit, or celebrate a special occasion, this is just the dish! And let's be honest, anything cooked in mass amounts of pasta sauce and cheese has to be outrageously delicious, right? RIGHT.

Great food, great True Blood, great friends, great night.♥

Aug 18, 2011

roasted green chiles 2 ways

You know what I love? Summer produce. Everything is beautiful, in season, and delicious. When I went to the grocery store last night, I was excited to see that green chiles were cheap, so I scooped up a handful of Anaheims, and began to hunt for tasty recipes. After browsing all the great ideas on Central Market, I decided to make my own version of the black bean stuffed bell pepper, and then add a chili cheddar biscuit on the side.

First and foremost. Stop everything you're doing, and roast your peppers! I didn't know this was necessary, but a chat with my mom confirmed that roasting your chiles is the best way to go. Simply plop your peppers onto a baking sheet and let them cook under the broiler approximately 5-10 minutes or until they're brown and blistering. Make sure you flip the chiles half way through to get both sides cooked, and when they're looking browned to perfection, take them out, peel off the skin, and use them up!
You can immediately use them in your recipes, or seal them in a plastic bag for future use. Tonight I did a little bit of both-I used 2 for my dinner, and stored the rest for stew, or burritos, or something else amazing.

For the quick-fix chili cheddar biscuits you need: 1. Bisquick Heart Smart mix 2. Milk- I used rice milk 3. Cheddar cheese 4. Roasted green chiles

I know using Bisquick is like, half cheating, but when you work all day, and want something delicious and fast, then shortcuts are often the answer. Besides. The Box said Heart Smart, so it can't be all bad, can it? :)

Follow the directions on the back of the Bisquick box stirring together the dry mix with your milk product. Add a healthy 1/2 cup of sharp cheddar cheese, 1 diced, roasted green chili, and pop those babies in the oven. 9 minutes later you will have yourself 5 soft, moist, cheesy biscuits, with just a slight hint of heat. They were absolutely to die for, but note for next time: more cheese & more chiles. Yummm
For the stuffed bell pepper you need: 1. 1 Bell pepper- I used red 2. Cous cous 3. 1/2 cup black beans 4. Cheddar cheese 5. Your favorite salsa 6. 1/4 diced onion 7. 1 roasted green chili diced

Start off by preparing your cous cous. You can also use rice, or any other grain, but I used cous cous since I had it on hand, and it cooks very quickly. While your grain is cooking, cut off the top of your bell pepper and scoop out anything that's inside. Now chop up your onion and green chili, measure out your cheese, black beans, and salsa, and when the cous cous is ready, mix everything together in a bowl and stuff it inside of your hollowed out bell pepper. You will definitely have lots of extra filling, but you can serve it as a side, or snack on it while your pepper is cooking.

Place the stuffed bell pepper into a baking dish with about 1/4 inch of water in the bottom, and put it into a 450 degree oven for about 30 minutes. The recipe I based mine off of said 30 minutes in a 350 degree oven, but just check on it occasionally, and when the pepper is soft and the stuffing is heated through, you're good to dig in!
Biscuits and stuffed peppers? A slightly strange combination, but both fantastic uses for my roasted green chili peppers. The slight hint of spicy heat in both recipes was perfection. I think my first time roasting peppers was incredibly successful, and now I can't wait to try my roasted green chiles in all sorts of new recipes! Yayy!

Jul 31, 2011

wrap week

I try to pack my lunch as often as possible, both to save money and calories, and sometimes I feel like I'm just eating the same old stuff day in and day out. Last week, I thought I'd give myself a fun theme, and pack my lunch everyday accordingly. Thus, last week became wrap week! Each lunch had to include a whole what tortilla stuffed with something new and delicious, and it was a total success.
Monday: Whole wheat tortilla with spicy brown mustard, cucumbers, spinach & avocado
Tuesday: Whole wheat tortilla with broccoli slaw & a Boca spicy chik'n patty
Wednesday: Whole wheat tortilla with BBQ tempeh & BBQ onions and bell peppers
Thursday: Whole wheat tortilla with kale, rice, tomatoes, feta cheese & black beans
Friday: Whole wheat tortilla with pesto, spinach, tomatoes and zucchini slices

Look at that! 5 fabulous wraps over a course of 5 days. By creatively mixing my leftovers with the staples in my fridge, I managed to make a handful of really different, and delicious meals on a small budget- what a great challenge! Also, all the fillings were super tasty, and would be equally great stuffed in a bagel, pita, or sandwich of some kind. I must say, it was an excellent wrap week, indeed :)

Jul 15, 2011

harry potter & the deathly hallows cookies

I love Harry Potter. Yep, I said it. I'm a total Harry Potter NERD. Binge-book reading, midnight movie openings, and collecting various wizarding paraphernalia- I've done it all, and now I can't believe the final movie in the series is here so soon. Harry Potter and the Deathly Hallows Part 2, officially hit theaters today, which meant that it was definitely an occasion to celebrate. Since Julie and I snagged tickets to the midnight showing, we properly celebrated yesterday with themed t-shirts, and a big batch of deathly hallows cookies.

For the cookie, I used the vanilla almond sugar cookie recipe from Bake at 350, and for the icing, I prepared a basic buttercream from an old-school Betty Crocker recipe I found in my parents' house.

I collected my recipes and ingredients, and when I was ready, I cut the cookie dough into triangle shapes using a cardboard template that I made. After baking and cooling, I frosted each triangle with the buttercream frosting, and then added the detail with black icing that I purchased at Michaels. I tried putting a decorating tip directly on the tube, but of course, the coupler didn't fit, and I had a giant black icing explosion all over the counter. I also tried putting the icing directly onto the cookie, but it was way too much black, and it looked horrendous. Finally, I put the black icing into a squeeze bottle with a little water, and that was perfect! Easy to handle, the right consistency, and just the ideal thickness for the black lines I wanted.

I have A LOT to learn about dessert decorating, but more than anything, I was just excited to do something special for the big day.
They're not perfect, but they tasted great, and everyone at the office loved them! It was just the thing to get everyone in the wizarding spirit :)
After a full day at the office getting completely cracked out on sugar cookies, it was finally time to grab some dinner and get in line at the theater. Julie and I arrived at 9:30 pm, and there were already TONS of people there!

The feeling in the theater was astounding. There were great costumes everywhere, and you could feel the positive, anxious, energy floating in the air. Someone told me that at our theater alone, there were supposed to be over 4500 people in attendance! It was phenomenal. Finally, after much waiting and great anticipation, we filed into our seats and the movie began! Yayyy!
It was a fantastic night, and even though I was completely exhausted today, it was totally worth it. A great movie, and an even better book- it's truly been a magical journey. If you're a Harry Potter fan like me, I highly recommend you read this beautiful article from NPR, it elegantly sums up so much of how I'm feeling right now. The movies may be over, but it's definitely not the end. Whatever comes next, you better believe I'm making cookies for it! :)

Jul 10, 2011

a quick fix picnic

For those of you who survived the Colorado monsoon of 2011, congrats! This last week primarily consisted of working, gymming, and trying to stay dry through the daily, torrential downpour. Luckily, Colorado weather is as sporadic as it is fabulous, and there was still plenty of sunshine to go around- there was just enough blue sky to fit in some kayaking today, and a lovely picnic yesterday.

Since finding a little dry weather was rare, the picnic was planned, prepared, and devoured quickly. Regardless of the time crunch, the food was fantastic, and the company was even better.

Here is the menu for some speedy picnic prep in under 30 minutes or less:
Appetizer: Raw vegetables and pita chips with hummus
Main: Pesto bowties with cherry tomatoes and feta
Side: Watermelon slices
Dessert: Strawberries and whipped cream over angel food cake
Everything was very semi-homemade, but I'm most proud of the pesto bowtie dish. It was inspired by one my friend's mom who made it for a party, and it was to die for! The flavors are outstanding, it looks elegant, and if you use all pre-prepared ingredients, it comes together crazy fast.

Stuff you need: 1. Bow-tie pasta 2. Pesto- homemade or store bought 3. Cherry tomatoes 4. Feta cheese

While the bowtie pasta is boiling, chop up all the veggies and fruits for the rest of the meal- carrots, celery and red bell pepper for hummus dipping, little cherry tomatoes for the pasta, watermelon for the side, and strawberries for dessert.

When the pasta is al dente, drain it, rinse it, and then toss it with the pesto, tomatoes, and feta in a large bowl. Pop the dish into the fridge and let all the flavors mix up to one hour. Once you have everything else prepped, packed, and ready to go, grab your pasta, your picnic blanket, and head to the park!
It would taste even better with homemade pesto, but I was in a time crunch, and this worked out perfectly. For a vegan version, all you'd have to do, is use a pesto without parmesan, and substitute dairy feta, for tofu feta crumbles.

It was brief, but delicious. Just as we were digging into some strawberries and angel food cake, the storm rolled in, and we all scarfed down our desserts. It was quickly made, and quickly consumed, but the memories will last much longer- no? Too cheesy? Yeah, I know. Anyway. Great pasta! Great picnic! :)

Jun 19, 2011

rainbow cupcakes & carrot cake cookies

Where do I begin? Between Father's Day, PRIDE, and Westword Music Fest, I don't know where I found the time to whip up such delicious sweets, but somehow I made it work :)

Friday night, I got together with some friends to make rainbow cupcakes, and properly kick off Pride weekend with dinner, dessert, and drinks. I was nervous to make the technicolor sweets, but I'm actually really proud of the outcome!

Stuff you need: 1. A box of white cake mix 2. White frosting 3. Food Coloring 4.Rainbow sprinkles

Start by making the cake batter according to the back of the box. When all the ingredients are mixed together properly, divide the batter into 4 separate bowls, and dye each bowl with a different color. Grease a muffin pan, and pour dollops of each color batter into every hole. Once again, follow the package for baking times, and when they're properly cooked, swirl on some frosting and top with rainbow sprinkles. For how phenomenal they turned out, they were actually quite easy, and fun, to make!
This was also my first time using a decorating bag with an icing tip, and I think they turned out great! Now all I need to do is practice, practice, practice, and hopefully I'll be making beautiful treats in no time! See how happy I am with my rainbow cakes? Yayy!
After a rowdy time at X bar, a day of great local music, and the Pride parade this morning, it was finally time to tackle my Father's Day gift! But first, did I mention I saw Mondo at the Pride parade?! He's one of my all-time favorite designers from Project Runway, and I just about peed my pants when I saw him this morning. *Insert squeals here* OMG MONDO I LOVE YOU!!
Anyway, back to baking. One of my Pop's favorite treats is carrot cake- it also happens to be the cake that my parents had at their wedding. I knew I had to do something special, so I went to Tasteologie, and found this great looking recipe for Carrot Cake Cookies. I followed the instructions as written for both cookie and icing, and let me tell you, they turned out so so good. My crappy phone camera does these cookies no justice. You'll just have to trust me- these babies are outstanding!
My Dad loved them! He said that eating just one of these cookies, was like devoring a giant triple layer slice of a great carrot cake. They're soft, decadent and the flavors are perfection. If you have a carrot cake fanatic in your family, I highly recommend you try these out.

Well it was a wonderful, crazy weekend filled with great people, great food, and great music. I love that this weekend was all about celebrating local music, equality, and fantastic dads- 3 of my favorite things! Happy PRIDE & Happy Father's Day!♥

Jun 16, 2011

overnight oats & homemade chips

I am not a morning person. In fact, I'm a total night owl, finding that my most productive hours are between 10 pm and 1 am. Because of this, I find it incredibly helpful to pack my gym bag, lunch, and anything else I can the night before. Enter, overnight oats. I made this recipe a lot last summer, and it's absolutely one of my favorites. Healthy, sweet, filling, and the perfect chilled breakfast for these hot summer days. The original recipe idea comes from Lorna Sass' cookbook Short-Cut Vegan, but I've altered it a little as well.

Stuff you need: 1. 2 cups old-fashioned rolled oats 2. 1 8 oz can crushed pineapple 3. 1.5 cups milk- or a soy milk of some sort if you'd like to make it vegan 4. cinnamon 5. Nutmeg6. 1 Banana

Just before going to bed, combine the oats, pineapple, and milk into a large bowl. Spinkle with a dash of cinnamon and nutmeg, cover, and pop in the refrigerator while you sleep. In the morning, scoop about 1 cup of the oats into a bowl, top with 1/2 a sliced banana, and dig in. No really, that's it!
It's so nice to have such a tasty meal already made for me in the morning, while I'm rushing around trying to get to work at a decent hour.The original recipe suggests using cardarmom and topping with toasted nuts or flax seed, but I like my changes as well. It still needs a little tweaking, but I think flavor perfection is almost there.

Also, on another late night note, I'm pleased to say that as of this evening, I have successfully prepared breakfast, lunch, and a snack for tomorrow. Less chaos for me in the morning! Currently, my favorite snack is homemade tortilla chips. If you've never made them yourself, you must try it.

Stuff you need: 1. Whole wheat tortillas 2. Olive oil 3. Sea salt

This is so incredibly easy and delicious, I may have to start making these all the time! Take your whole wheat tortilla and slice it into little triangles. I simply continuously folded my tortilla until I had little bite sized pieces. Place these tortilla chunks into your toaster over- or on a baking sheet in a real oven. Lightly coat with olive oil and coarse seal salt, and pop them in the hot oven at 325 for 5-10 minutes. Check on them often, making sure they become golden, but not brown. When golden, flip them over and bake for an additional 5-10 minutes.
They are crispy, yet buttery, with just a hint of saltiness. You can serve them with salsa or guacamole, but I eat them plain cause I think they're that good. Mmm! Seriously. Bestest, most easiest snack EVER.

Oh! And one last thing-see how this late-night energy really kicks in? Tonight I also rummaged around in my craft bin, looking for something fun to make in honor of this festivity-filled weekend ahead of us. I found a tub of round beads in rainbow colors, popped in Julie & Julia, and 2 hours later, I'm filled with good-chick-flick vibes and half a dozen fun bracelets for my accessorizing pleasure. Pre-made meals, a heart-warming movie, and a little bit of crafting to boot. What a lovely Thursday evening, indeed!

Jun 2, 2011

chorizo & sweet potato enchiladas

A few weeks ago, I was lurking over at Budget Bytes- one of my favorite blog haunts- and I came across the recipe for chorizo and sweet potato enchiladas. My initial thought was, all that crap? In enchiladas? No way. I think I've gotten too comfortable in my cheese and black bean enchilada rut. I sat on this thought for a week or so, and finally decided to be bold, and to try out this dish on a couple friends for dinner last night.

I stuck to the recipe pretty closely, except I used regular sized whole wheat tortillas for jumbo enchiladas, substituted Old El Paso sauce for Las Palmas, used Anaheim peppers since the store was out of Poblanos, and finally, used vegetarian chorizo instead of the meaty kind! That's right. Those chorizo enchiladas got vegatized!
So I chopped and sauteed everything according to direction, and pulled out a casserole dish. Budget Bytes says to coat the pan with non-stick cooking spray, but if you cover the bottom of the dish with a little enchilada sauce, it works just fine. I rolled the enchiladas, popped them in the oven, and 25 minutes later, I was rewarded with an outrageously delicious meal.
Oh my, doesn't that look amazing? Trust me, they taste even better than they look! I told myself I would only eat 1, but that didn't happen- I ate a few :) The sweet potatoes give this dish a great chewy bite, and the Anaheims + faux chorizo give it just the perfect amount of spiciness! All three of my carnivorous friends said they were damn good too! This is a dish I will definitely make again. And again. And again.

Oh! And if you're looking for a meat-free chorizo, I used Field Roast's Mexican Chipotle Sausage, and I highly recommend it! The texture is dead on - it even comes in a casing- and the flavor is great. Moral of the story is that the vegatized version of the sweet potato and chorizo enchiladas were a huge hit, and I can't wait to make them again! Yum!

May 19, 2011

greek lentil salad

One of my favorite guilty pleasures is magazine buying- Vogue, Elle, Nylon, you name it, and occasionally I'll break down and buy it. I have a hard time justifying purchasing fashion magazines since it feels frivolous, but I have absolutely no problem picking up the newest addition of Vegetarian Times. Fun articles, new ideas, and always great looking recipes. This month they began a 28 day boot camp with daily de-bunked myths and healthy meals, and let me tell you, I jumped on board immediately!

The recipe for day 1 was Greek lentil salad, and it looked so fresh and tasty, I couldn't help but making it right away. They suggest making it for a take away lunch or light dinner, so I made a full batch in preparation for this week's lunches as work. Look how productive I am eating lunch at my desk.

This was my first time ever cooking lentils, and I'm pretty pleased. I love that they're low in sodium and high in protein, which is just what I need more of in my diet. However, I don't think I properly cooked them all the way through, so the salad came out slightly tough. On that note, I wish there was more sauce- more olive oil or lemon juice or something to sop up that dry crunchiness- but then again, maybe that might be solved by properly cooking the lentils? Oops.

It's a pretty good recipe with a great flavor profile. I like it, but I don't love it. When all this rain passes and I'm ready for a fresh, light meal, I'll definitely try this one out again- and next time, I'll properly cook those lentils too! :)

May 14, 2011

tostada pizzas

This is the first time in my life that I've ever lived on my own, and grocery shopping for one is definitely interesting. I'm finding out that food sticks around a lot longer when it's just me, which means when I make a big pot of soup, I eat soup for 12 straight meals. Hm. I need to 1. learn to utilize the freezer and 2. get more creative with my leftovers and large quantity ingredients.

This is the situation I have found myself in with pasta sauce. I have some Newman's Own hanging out in my fridge, and a person can eat only so much pasta. Thus! Tostada pizzas.

Stuff you need: 1. Corn tortillas 2. Pasta sauce 3. Cheese 4. Toppings 5. Italian Seasoning 6. Olive oil

Turn your oven to broil, and while it's warming up, fry up your corn tortillas in a skillet with a splash of olive oil so they're a little crispy. Slice up your toppings, and shred your cheese, and when everything is ready, assemble your wee pizzas. Top the tortillas with sauce, then shredded cheese (I had monterey jack), then your veggie toppings (I used tomatoes), then more cheese (I used parmesan), and finally some Italian seasoning sprinkled over the whole deal.

Pop it under the broiler for 5-10 minutes until the cheese is melty and devour!

I think the corn tortilla was a really nice flavor for the pizza, and it was perfectly crispy and easy to just pop in your mouth! It also came together super fast and totally hit the spot for my gin hangover. Double score.

I will definitely be thinking more creatively towards my ingredients. In fact, Food Network has 50 fun ideas for your pasta sauce. I personally like it over polenta, over steamed broccoli and white beans, and now on creative pizzas too! Lotsa pasta sauce? No problem :)

May 10, 2011

boca beef tacos

I've said it before, and I'll say it again: you can put just about anything into a taco, and it will be delicious. Last time, I think I used Boca chik'n patties with a hodge podge of random things I found in the kitchen. Tonight, however, I went over to Michael's house, where we vegatized the classic beef taco!

If you haven't discovered Boca ground crumbles yet, go to the store and purchase them right now! They're a meatless version of ground beef, but way better. I usually use them in marinara sauce over pasta, but tonight, we mixed it up and used it in tacos.

Stuff you need: 1. Boca ground crumbles 2. a taco seasoning packet or your spices of choice 3. corn tortillas 4. taco extras- salsa, avocado, onion, lettuce, tomatoes, beans, cheese, etc.

Start by browning/warming your Boca crumbles in a skillet with a little olive oil. When they're totally defrosted and warmed through, plop in your taco seasoning packet according to the directions on the side- there are tons of different brands, but ours was mixed with 2/3 cups water, added to the "beef" and then simmered for a few minutes.

When the meatless meat mixture is all gooey and ready to go, chop up your taco extras. Tonight we had 505 salsa, a little bit of shredded cheese, black beans, avocado chunks, and red onion. Nuke the tortillas in the microwave for a hot second, and then fill to the brim with everything!
It looks like a legit beef taco, right? The seasoning packet was a great idea. The mixture may have been a little salty since we only used half of the crumbles- the entire bag would have distributed the flavors better- but otherwise, a tasty meal! This is definitely one of those dishes that hardcore carnivores would happily devour with no complaints. Another delicious use for Boca crumbles is a success! :)

Apr 24, 2011

easter festivities

A Happy Easter to everyone binge-eating jelly beans and dying Easter eggs today. I may be 24, but nothing makes me happier than pretending I'm 5, and painting silly things on eggs once a year.
I come from a large Catholic family, so Easter is always a big deal. This large family, mind you, is not vegetarian, and we always have the traditional Honey Baked Ham. Minus the meat, there's always tons of great food and way too much candy. In fact, here's a great list of vegan candy from PETA. I had no idea that a lot of my favorites were vegan! Total score.

Also, for my family celebration today, I brought a citrus quinoa salad that I found at Tall Green Grass. It's a pretty tasty dish, but definitely needed some tweaking. I doubled it, cooked the quinoa in vegetable broth, added another 1/2 lemon of juice, a little more siracha, and a pinch of salt for serving. Otherwise, I was pleased to introduce a large number of my family members to quinoa, since they had no idea what it was. I think they liked it too :)
On a crafty note, I wanted to pass along a super cute sewing pattern I found last week. My Grandma is in the hospital right now, and since she couldn't make it to the Easter celebration, I thought I'd bring a little Easter to her. The pattern and tutorial are here at Craft Gossip. I'm a total novice when it comes to sewing, but it was a moderately easy project that only took me a few hours to do during one of my late night spurts of energy.
I always find projects to start, but rarely finish them, so I'm really excited that I actually finished this little guy and he turned out great to boot. Most importantly though, my Grandma loved him, and it totally brightened her day.

It was a delicious day, but a long and busy one as well. It's time to eat some left over quinoa and a few more jelly beans before bed. Happy Easter! ♥